
Your Guide to an ADA Compliance Website Audit


An ADA compliance website audit is a deep dive into your website to make sure it's fully accessible to people with disabilities, lining up with standards like the Web Content Accessibility Guidelines (WCAG). It's a mix of automated scans and real, human testing to find and demolish any roadblocks that keep people from using your site.
- An ADA compliance website audit combines automated scans and manual testing to find accessibility barriers.
- Meeting WCAG standards protects your business from legal risk and opens your site to a wider audience.
- A clear remediation plan with prioritized fixes turns audit findings into real accessibility improvements.
Think of it as the essential first step to protecting your business from a lawsuit and, just as importantly, welcoming a much wider audience.
Why ADA Compliance Audits Are a Business Imperative
Running an ADA compliance audit has gone from a "nice-to-have" technical task to an absolute must-do for any serious business. Let's be real: ignoring digital accessibility isn't just leaving money on the table; it's a huge financial and reputational gamble. Being proactive isn't optional anymore—it’s your first line of defense against a flood of litigation.
The legal ground is shifting fast, with lawsuits hitting businesses of every size. The numbers don't lie. In the first half of 2025 alone, a whopping 2,014 ADA website accessibility lawsuits were filed in the U.S. That's a 37% jump from the same period in 2024. This isn't just a big-business problem, either. In 2023, 77% of these lawsuits targeted small businesses with under $25 million in revenue. You can dig into the full report on this litigation surge for more details.
More Than Just Legal Protection
While dodging a lawsuit is a pretty good motivator, the upsides of an accessibility audit go way beyond just playing defense. A truly accessible website opens your doors to a massive market that most businesses completely ignore. Globally, we're talking about one billion people living with some form of disability.
When you make your site usable for everyone, you're not just doing the right thing. You're tapping into a loyal customer base and showing that your brand actually cares about inclusivity.
It's a two-for-one deal:
- A Better Experience for Everyone: Funny enough, the changes you make for accessibility often make your site easier to use for all your visitors. Think clear navigation, easy-to-read text, and a logical layout—it’s just good design.
- A Nice SEO Boost: A lot of accessibility best practices, like using alt text for images and structuring your content with proper headings, are exactly what search engines love to see. These elements help Google understand your content better, which can give you a nice bump in the rankings. You can learn more in our guide on SEO fundamentals.
A proactive ADA compliance website audit isn't about checking a legal box. It's about turning a requirement into a real competitive advantage by building a better, more inclusive web that serves every single potential customer.
The Real Cost of Non-Compliance
The fallout from ignoring accessibility is real and it hurts. Forget just the legal settlements, which can easily run from $5,000 to $20,000 (or much more). Non-compliance flat-out damages your brand.
It sends a clear message: you're not interested in serving everyone in the community. In a world where people vote with their wallets and support socially responsible companies, that's a good way to lose customers and earn a bad reputation.
At the end of the day, a regular ADA compliance audit is a smart investment in your business's future. It shields you from legal trouble, grows your potential market, and shows the world you're a brand that values diversity and inclusion. The question isn't if you should do an audit, but how soon you can get it done.
Decoding WCAG for Your Accessibility Audit
To really nail an ADA compliance website audit, you have to know the rulebook everyone's playing by. That rulebook is the Web Content Accessibility Guidelines (WCAG). Even though the ADA itself doesn't point to a specific technical standard, WCAG is what courts and regulators look to.
Think of it as the blueprint for what "full and equal enjoyment" actually looks like online.
The Four Pillars of WCAG
Before diving into a sea of technical rules, it helps to understand the four core principles that hold everything up. They’re easy to remember with the acronym POUR, and they frame every part of a good audit.
Instead of getting lost in the weeds, start by asking if your website meets these fundamental user needs.
- Perceivable: Can people actually see and hear your content? This is where basics like alt text for images, captions for videos, and good color contrast come into play. If someone can't perceive the information, nothing else matters.
- Operable: Can users get around and make things work? This means your site needs to be fully navigable with just a keyboard. It also means giving people enough time to read content and avoiding flashy elements that could trigger seizures.
- Understandable: Is the content clear, and does the site behave predictably? This is about using plain language, providing straightforward instructions on forms, and building a consistent navigation that doesn't leave visitors guessing.
- Robust: Can your site be reliably understood by different browsers and, most importantly, assistive technologies? This is the most technical pillar. It's all about clean code (like using HTML tags correctly) so that screen readers and other tools can interpret your content without errors.
The W3C provides a helpful visual that shows how these big ideas break down into actionable guidelines.
As you can see, the high-level principles cascade down into specific, testable rules—the very things you'll be checking for in your audit. Familiarizing yourself with the various accessibility features that help meet these standards is a great place to start.
Conformance Levels: A, AA, and AAA
WCAG doesn't have a one-size-fits-all approach. Instead, it uses three levels of conformance, each one building on the last.
- Level A (Essential): This is the absolute baseline. Failing to meet these criteria creates serious roadblocks for users with disabilities.
- Level AA (Recommended): This level tackles the most common and significant barriers people face online. For good reason, WCAG 2.1 Level AA has become the go-to legal benchmark in most court cases and settlements.
- Level AAA (Advanced): This is the highest standard. It's usually reserved for specialized websites or specific sections of a site that cater directly to an audience with disabilities.
When you conduct an ADA compliance website audit, your target should be meeting all Level A and Level AA criteria. This is the de facto standard for showing you're serious about accessibility and for staying out of legal trouble.
The push for digital access isn't just a local trend; it's a global movement. In the U.S., the Department of Justice is stepping up enforcement, with 8,800 ADA Title III complaints filed in 2024 alone—that's a 7% jump from the year before.
Meanwhile, countries like Australia and New Zealand are also officially adopting WCAG, making it clear that this is the universal standard. Getting a handle on these guidelines is the critical first step in any thorough ADA website compliance audit.
Combining Automated and Manual Audit Methods
Relying only on automated scanners for your ADA compliance audit is like asking a home inspector to check out your house from the curb. They might spot a broken window, but they’ll have no idea about the faulty wiring hidden in the walls. A truly solid audit blends the raw speed of automation with the nuanced, critical thinking that only a human can provide.
Automated tools are fantastic for that first big sweep. They can crawl your entire site in minutes, flagging widespread, low-hanging fruit like missing alt text, empty links, or obvious color contrast violations. This scan gives you a quick, high-level report card on your site's health and a starting list of fixes.
But here’s the catch: automated scans can only detect about 30-40% of all potential WCAG issues. That’s it. They don’t understand context, they can’t follow a complex user journey, and they certainly can’t tell you what it feels like for someone using assistive technology. This is where manual testing becomes non-negotiable.
The Role of Automated Scanners
Think of automated tools as your tireless assistants. They handle the repetitive, mind-numbing checks that would take a person ages to get through. When you fold these tools into your audit strategy, look at what they do best. For instance, reviewing screenask's features shows how such a tool can quickly pinpoint common technical errors.
Automated tools are great at finding things like:
- Missing
alttext: The scanner quickly flags any<img>tag that’s missing an alt attribute. - Low text contrast: It programmatically compares the color codes of text against its background.
- Empty links or buttons: It finds
<a>or<button>tags that have no text to describe where they go. - Missing form labels: It can spot
<input>fields that aren't properly connected to a<label>.
Even with these strengths, the web is full of sites that get a passing grade from a scanner but are still an absolute nightmare to use. A recent WebAIM Million Project analysis found that a staggering 94.8% of the world's top one million homepages had detectable WCAG 2 failures.
The most common culprits? Low contrast text (79.1%), missing alt text (55.5%), and missing form labels (48.2%). These are the exact issues scanners are built to catch, yet they persist. It just goes to show you that a quick scan isn’t enough.
Where Manual Testing Is Non-Negotiable
Manual testing is where you uncover the subtle, experience-breaking problems that make a site truly unusable. It means putting yourself in the shoes of someone with a disability and trying to use your site the way they do. This human-led approach is the only way to check for genuine accessibility.
You simply can’t automate everything. A balanced audit requires a close look at both what the code says and what the user actually experiences.
| Testing Aspect | Automated Scanners | Manual Checks |
|---|---|---|
| Speed & Scale | Fast. Can scan thousands of pages in minutes. | Slow. Requires page-by-page, element-by-element review. |
| Error Detection Rate | Catches 30-40% of WCAG issues, primarily code-based violations. | Catches 100% of issues, including context and user experience flaws. |
| Contextual Understanding | None. Cannot determine if alt text is meaningful or if focus order is logical. | Essential. The entire process is about understanding user flow and context. |
| Real User Experience | Cannot simulate the experience of using assistive technology. | Directly tests the experience with tools like screen readers and keyboard-only navigation. |
| Common Issues Found | Missing alt text, low contrast, empty links, missing form labels. | Keyboard traps, illogical reading order, confusing link text, poor screen reader announcements. |
| Cost | Varies from free tools to expensive subscriptions. | Labor-intensive and requires expertise, leading to higher costs. |
In the end, automation gives you data points, while manual testing gives you the full story.
Here are a few critical areas that absolutely demand a manual review:
Keyboard-Only Navigation
Can someone navigate your entire site using only their keyboard? We’re talking just the "Tab," "Shift+Tab," "Enter," and "Spacebar" keys. An automated tool can't tell you if the focus order jumps all over the page or if a user gets permanently stuck inside a pop-up modal—a "keyboard trap."
Unplug your mouse and give it a shot. Can you get to every link, button, and form field? And when you do, is the visual focus indicator (that little outline) easy to see?
Screen Reader Experience
This is probably the most important manual check you can do. Firing up a screen reader like NVDA, VoiceOver, or JAWS gives you unfiltered access to how a visually impaired person experiences your content.
You need to listen for:
- Descriptive link text: Does a link that just says "Click here" make any sense when read out of context?
- Logical heading structure: Do the headings create a coherent outline, or is it a jumbled mess?
- Clear form announcements: Are instructions and error messages for forms actually read aloud?
- Meaningful alt text: Does the alt text describe the purpose of the image, or is it just a lazy, keyword-stuffed phrase?
This is all about ensuring the experience aligns with the four core principles of accessibility: Perceivable, Operable, Understandable, and Robust (POUR).
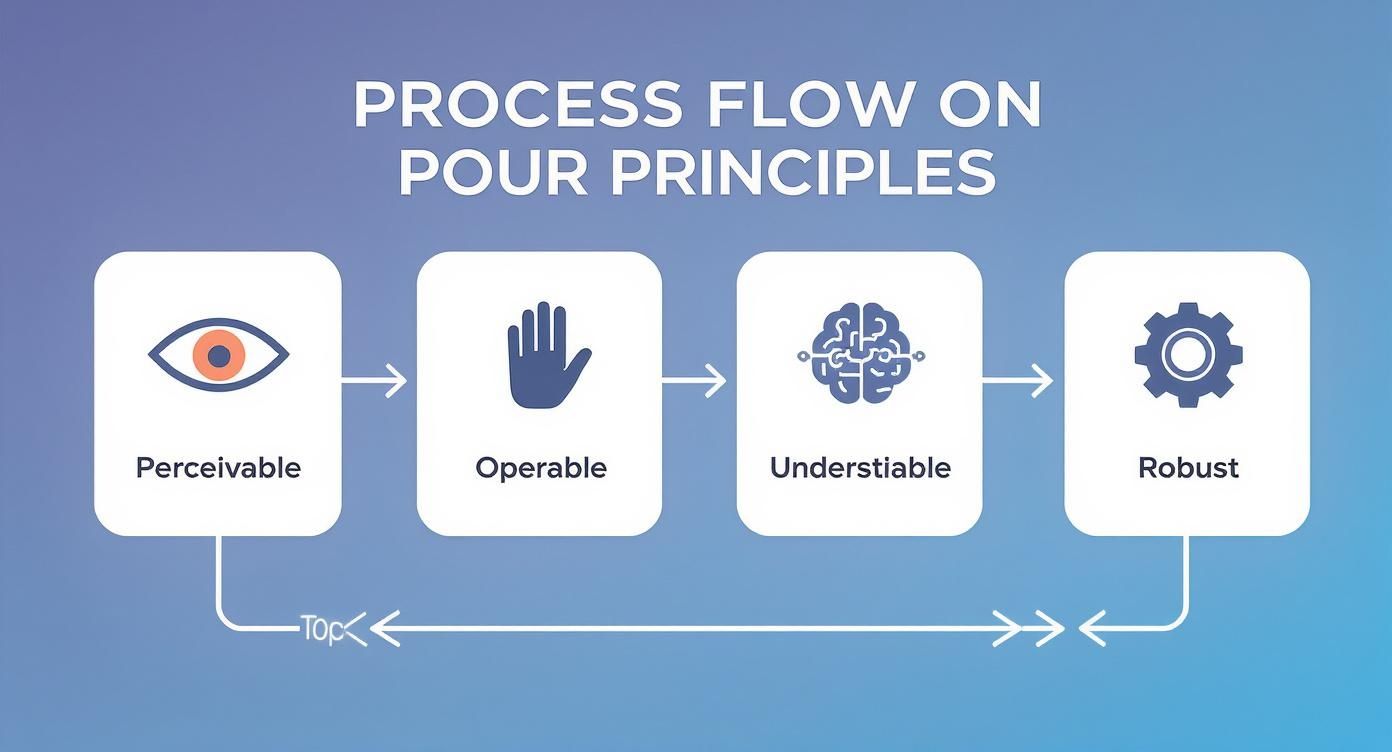
Manually testing against these four pillars confirms whether your site isn’t just technically compliant, but genuinely usable for everyone.
Content and Context Evaluation
A machine can’t judge the quality of your content. You need a person to read through and determine if your language is simple and clear, if instructions are easy to follow, and if complex ideas are broken down in a way that makes sense.
By building a hybrid workflow—starting with a broad automated scan and then diving deep with targeted manual checks—you get a complete picture of your website's accessibility. It’s the only reliable way to lower your legal risk and build something that truly works for all your users.
Your Page-by-Page Audit Checklist
This is where the rubber meets the road. A truly effective ADA compliance website audit goes beyond high-level principles and dives into a methodical, hands-on review of your key pages.
Let's be realistic: you can't test every single page on a large site. The goal is to pick a representative sample that covers all your unique templates and the critical paths your users take.
Think about the core journey a visitor follows, from the moment they land on your site to when they complete an important action. A solid page sample should always include:
- The Homepage: It’s your digital front door and usually the most complex page.
- Main Navigation Pages: These are your key "About Us," "Services," or "Products" pages.
- Contact Page: Absolutely essential for communication, especially the contact form itself.
- A Content Page: A typical blog post or article is perfect for checking reading accessibility.
- E-commerce Funnel: If you sell online, you need to test a product category page, a specific product page, the shopping cart, and the entire checkout flow.
With your sample pages chosen, you can start the page-by-page review. This part of the process is a mix of simple observation and using free tools already built into your browser or available as extensions.
Inspecting Core Page Components
Every page, no matter its purpose, is built on fundamental components that need an accessibility check. I always start with these universal elements before digging into page-specific features. Why? Because you'll often uncover sitewide issues that can be fixed at the template level, saving a ton of time.
First up, the heading structure. Use your browser's developer tools (just right-click and "Inspect") or an extension to see the document outline. Is there only one <h1>? Do the headings follow a logical order (<h2> after <h1>, <h3> after <h2>) without skipping any levels? A clean heading structure is like a table of contents for someone using a screen reader.
Next, let's talk images. Every meaningful image needs descriptive alternative (alt) text. This isn't just about clearing an error flag; it’s about conveying the purpose of the image. For a product shot, the alt text should describe the item. For an icon that links somewhere, it should describe the action, like "View your shopping cart." Decorative images should have empty alt text (alt="") so screen readers know to just skip them.
Remember, the real goal of an ADA compliance website audit is to assess real-world usability, not just to pass an automated scan. Manually checking elements like alt text for genuine meaning and context is a critical step that tools simply can't do for you.
Finally, take a look at all the links on the page. Is the link text descriptive on its own? A screen reader user often navigates by pulling up a list of all the links. Links that just say "Click Here" or "Learn More" are completely meaningless without their surrounding context. The link text itself should clearly state the destination or the action.
Auditing Interactive Elements and Forms
Interactive elements are where accessibility often falls apart. This covers everything from dropdown menus and image carousels to complex submission forms. Your manual audit has to put these elements through their paces.
The most important test here is keyboard navigation. Can you get to and operate every single interactive element using only the Tab key (to move forward), Shift+Tab (to move back), and Enter/Spacebar (to activate)? As you tab through the page, a visible focus indicator—usually a blue or black outline—must clearly show which element is currently active. If that outline is missing or tough to see, keyboard users are flying blind.
Pay close attention to forms. Every form field needs a properly associated <label>. You can test this easily: clicking the label should immediately place your cursor in its corresponding input field. Placeholder text is not a substitute for a real label.
For any contact or checkout form, test the entire process from start to finish:
- Tab through every field: Is the order logical and predictable?
- Fill it out using only your keyboard: Can you select radio buttons and checkboxes with the spacebar?
- Submit with an error on purpose: When an error message pops up, is it announced by a screen reader? Does it clearly explain which field is wrong and how to fix it?
This kind of detailed, scenario-based testing is what separates a surface-level check from a thorough, useful audit.
Checking Media and Content Readability
The content itself is a huge part of the user experience. An accessible website ensures that everyone can consume this content, regardless of their abilities.
Start with color contrast. Use a browser extension to check the contrast ratio between your text and its background. For standard-sized text, the ratio must be at least 4.5:1 to meet WCAG AA standards. This is one of the most common issues I find on websites, but it's often a simple fix in the CSS.
If your site has video or audio, check for accessibility features. All pre-recorded videos must have accurate, synchronized closed captions. It's also a best practice to provide a full text transcript. These not only help users with hearing impairments but also benefit people in noisy environments or non-native speakers.
Finally, think about overall readability. Can users resize the text to 200% without the layout breaking or content overlapping? Does the text reflow properly without forcing them to scroll horizontally? This ensures that users with low vision can magnify your content to a size that's comfortable for them to read. Combining these manual checks with the data from automated tools will give you a complete and actionable picture of your site's compliance status.
Creating an Actionable Remediation Plan
An ADA compliance website audit is only as good as the action it inspires. Once you've pinpointed the accessibility barriers on your site, the real work begins. The next step is to transform that raw data into a clear, prioritized remediation plan that your team can actually use to make improvements.
A simple spreadsheet of errors just won't cut it. To get buy-in and drive real change, you have to document your findings in a way that’s understandable to everyone—from developers writing the code to project managers allocating resources. This means translating technical WCAG jargon into plain-language, actionable tasks.
Prioritizing Your Fixes
Let's be real: not all accessibility issues are created equal. Trying to fix everything at once is a recipe for overwhelm and inaction. The key to a successful remediation strategy is ruthless prioritization. You have to triage issues based on their real-world impact on users and the level of legal risk they pose.
A logical way to start sorting things is by impact:
- Critical Blockers: These are the showstoppers. We're talking about issues that completely prevent someone from completing a core task, like a checkout button that a keyboard user can't activate. These need to be fixed immediately. They represent the highest legal risk and cause the most user frustration.
- High-Impact Issues: These problems don't completely block a user, but they make tasks incredibly difficult or confusing. Think of a form with missing labels that a screen reader can't properly announce. A determined user might power through, but the experience is terrible and presents a significant compliance gap.
- Medium-Impact Issues: This bucket is for problems that hurt usability but don't derail the user's entire journey. A low contrast ratio on blog post text, for example, makes it hard to read but doesn't prevent someone from getting to the content.
- Low-Impact Issues: These are often minor technical violations with a minimal effect on the user experience. A great example is a decorative image having redundant alt text instead of an empty
alt=""tag. It's technically wrong, but not a dealbreaker.
This tiered approach lets your team focus their energy where it matters most. By tackling the most severe problems first, you can quickly reduce your legal exposure and make huge improvements in usability.
Documenting Issues for Action
For a developer to fix a problem, they need more than just a note saying "this is broken." Each documented issue in your remediation plan should be a self-contained ticket with all the necessary context. This is what turns a static audit report into a dynamic project roadmap.
Every single issue you log should include these key details:
- A Clear Title: Describe the problem concisely. Something like, "Keyboard Focus Not Visible on Main Navigation Links."
- Location: Give them the exact URL where you found the issue.
- WCAG Guideline: Reference the specific WCAG success criterion being violated (e.g., "WCAG 2.4.7 Focus Visible"). This helps with tracking and validation.
- Detailed Description: Explain the problem from a user's perspective. For instance, "When tabbing through the main navigation, there is no visual indicator to show which link is currently selected, making it impossible for keyboard-only users to navigate."
- Visual Evidence: Screenshots or short video recordings are gold. They show the problem in action and leave no room for misinterpretation.
- Code Snippets: If you can, provide the relevant HTML or CSS that's causing the problem.
- Suggested Remediation: Offer a clear, technical recommendation for the fix. For example, "Apply a CSS
:focusstyle to the navigation links with a high-contrast outline."
By packaging each finding with this level of detail, you remove guesswork and empower your development team to implement fixes quickly and accurately. This structured documentation is the bridge between identifying a problem and getting it solved.
An effective audit always culminates in this kind of actionable plan. It shifts the focus from just finding flaws to systematically eliminating them, ensuring your investment in the audit process leads to a genuinely more accessible and compliant website for everyone.
Common Questions About ADA Website Audits
Even after deciding an ADA compliance audit is the right move, you're bound to have questions. It can feel like a complicated process, but getting answers to the usual queries helps clear things up and gets your team ready for what's next. Let's walk through some of the most common concerns.
One of the first things people ask is if a small business really needs to worry about this. The short answer? Yes. Lawsuits don't just target massive corporations. Businesses of all sizes get hit, especially in states like California and New York where local laws add even more legal pressure.
Another big question mark is always the cost. What should a proper audit set you back? The truth is, prices can swing wildly, from a few thousand dollars to over $30,000. It all depends on your website's size and complexity. A simple five-page brochure site will be far less expensive to audit than a sprawling e-commerce platform with thousands of unique page templates and interactive features.
Be wary of suspiciously cheap audits. A rock-bottom price often means the provider is just running an automated scan. These tools are notorious for missing up to 70% of real-world accessibility problems, giving you a completely false sense of security.
How Long Does an Audit Take?
The timeline for an ADA compliance audit is another practical concern, and just like the cost, it hinges on your site’s scope. A small website audit might wrap up in a week or two. On the other hand, a deep-dive review of a large, dynamic site could easily take a month or more.
The whole process has a few key stages:
- Initial Automated Scan: This gives a quick, high-level overview to find the low-hanging fruit.
- Manual Testing: This is where the real work happens and what takes the most time. Auditors manually test key user journeys, page templates, and interactive elements.
- Assistive Technology Testing: Experts use screen readers and other tools to experience the site just like a user with disabilities would.
- Reporting: All the findings are compiled into a clear, actionable report your developers can use.
Simply put, a rushed audit is a wasted audit. Patience pays off.
Is an Accessibility Statement Enough?
Some businesses wonder if they can just post an accessibility statement and call it a day. While having a statement is an absolute must-have, it's not a get-out-of-jail-free card. An accessibility statement declares your commitment and gives users a way to report problems, but it won't protect you if the site itself is still broken for them.
Your legal obligations don't stop at your website's functionality, either. They also cover other digital assets, including the legal documents on your site. For a deeper look into a related area, you can learn more about keeping your privacy policy compliant, which is another crucial part of managing your digital presence.
Finally, people often ask about what happens after the audit. An audit is just a snapshot in time. To stay compliant, you have to build accessibility into your everyday workflow. That means training your content team, educating your developers, and running regular spot-checks, especially after major site updates. Accessibility isn’t a one-and-done project; it’s an ongoing commitment.
Ready to make your website accessible to everyone and protect your business from legal risk? The team at Site Igniters offers comprehensive ADA and WCAG 2.1 compliance audits and remediation services. We combine expert manual testing with powerful tools to create an actionable plan that your team can implement with confidence. Contact us today to start your journey toward a more inclusive digital presence.
Seth Sanders is the founder of Site Igniters, a digital marketing agency in El Dorado Hills, California.